Master the Art of Hair Masking in Photoshop
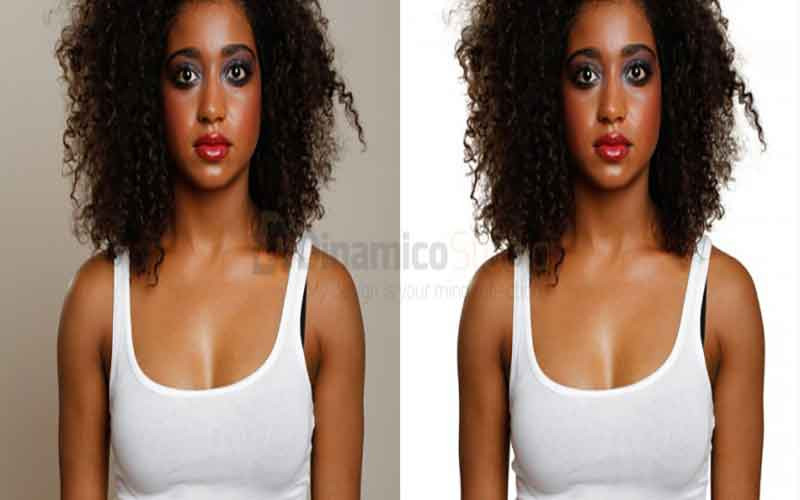
Today, I'm going to show you how easy it is to cut or mask hair out of a photo without ruining the haircut with Photoshop. This advanced technique makes it simpler to separate the hair from the busy background. We must use an accurate mask, or else there will be inaccuracies in the final product. There are many different masks for cutting out hair depending on what type of image you're working with, but today I want to teach you my favorite one?the background eraser tool! The custom brush may be used to create digital hair. Make sure you have a hair layer. The original image is always at the bottom of the layer. Sometimes you get better results by creating a hairbrush from an image using strands of hair. For this technique, I utilized curly hair. Make sure to examine your hair against a light gray background. In this Photoshop tutorial, you'll learn how to use the Background Eraser Tool to remove background from hair. Photoshop CC can help you with this.
How to Mask Hair in Photoshop
- Background Eraser Masking
- Alpha Channel Masking
- Clipping Masking.
- Color Range Masking etc.
Step 1: A clipping path can be used to create an outline around the image.
It's easy to see why Photoshop is so popular among photographers. A clipping path is a useful tool for removing objects from a colored background or original background. We use the pen tool to cut the area from the background image. To select stray hair, use the Lasso tool. It may not seem very easy at first, but it doesn't take long before you're creating your masterpieces and feeling like a professional artist in the comfort of your home with this powerful software! Even if you don't have any artistic skills whatsoever (like me!), there are plenty of tutorials online that will help guide you through using Adobe Photoshop CS3 or CC for beginners. You'll be able to edit photos professionally without ever having taken one yourself? What more could we ask from life?
CS3, CS5, CS6, and CC are recommended. Open your desired picture in Photoshop cut out hair. Duplicate your picture using the Open Photoshop layer. To begin, create a clipping path in the original layer surrounding the image. Double the primary layer and use two layers behind the duplicate layer (Ctrl + j or command + j). The first layer is 100% black, and the next layer is a pure white solid background.

Step 2: Setup the Brush and Background Eraser tool.
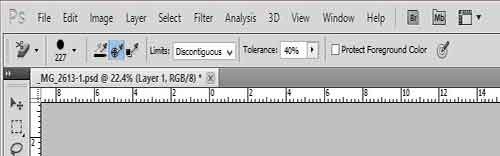
Now let me show you how to remove any unwanted hair while keeping the color intact. In the menu bar, I will first use the Background Eraser Tool and set up my brush with a hardness of 100% and spacing of 25%. Next, select Sampling once from Discontiguous Tolerance on the top navigation bar in Photoshop: As Needed.
The output tone should be friendly, as we are about to learn something new or become experts, so that it feels like an authentic tutorial.
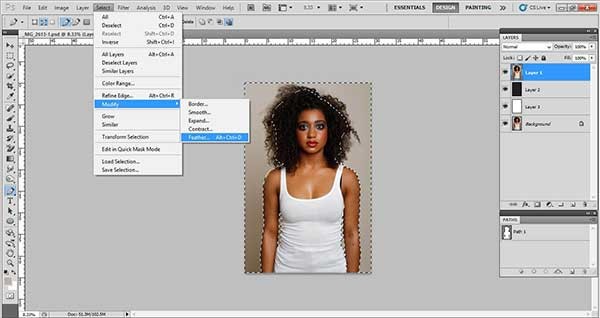
Step 3: Feather and Erase Background
You'll want to make sure you select the path first and then reverse it. You can do this with Control+enter or Cmd+Enter on a Mac, or click once in that layer before pressing Ctrl + I (Shift + cmd +I). Give your feather edge 0.3% for additional shaping and style! Erase any background contents before saving it as a PSD file in PNG-24 format.

Step 4: Removing White shades
After erasing the background, we are all done. It would seem that there is no work left to do, but in reality, our task has just begun! One thing you may not have noticed were the dust and spots on your image's surface. With what I'm about to show you next, you can remove these things with ease. Clicking a little button called Background Eraser will bring up brushing options for this tool: set its hardness to 0% (this means it won't be harsh), spacing to 25%, sampling of "Background Swatch," and limit discontiguous tolerance to 60?80%. In all honesty, though, my favorite part of removing white shades from an image is getting rid of those pesky dust or spot marks too!
To make your retouching job as amazing as it can be, start by making sure you have a clean canvas. This means erasing around the subject's hair so that their locks are smooth and free of any distractions. Choose the path and press Ctrl+Enter or Cmd+Enter, then invert layer (Shift+Ctrl-I or Shift +Cmd I) and give feathering 0.5% erase around the hair. It's a great way to remove white shades. Make sure the foreground color is default with a background
.
Step 5: Checking Hidden Dust and Spot
Wow, it is a wonderful tool to check the quality of masking! After all the processes, I thought that we were done. But wait?there are many dust particles and spots around the hair. How can we make sure they're gone? Let's start with the Curve Tool by making the pure background white in order to show hidden dust and spots more easily after this step has been completed successfully. There will be much less hidden dirt on our masked image underneath when you use curve for any other purpose as well! This is how you can get rid of additional hair. Check out these screenshots below.

Step 6: Removing Hidden Dust and Spot
Dust and spots on hair are a common problem, but there's no need to worry! I have a tried-and-true way of removing these pesky things. Select the Erase tool and set up the brush tool with a Spatter 59-pixel brush or any round shape you prefer. Set your opacity at 100%, hardness at 100% (unless it's too bright), and flow rate between 80% and 100%. Now erase around where we want dust or spots removed from our image?the layer should be transparent if done right so that only what is supposed to show through will do so; this great technology can help remove unwanted marks while still preserving more desirable parts of an original photo.
We all know how amazing it feels when a hair mask is applied to our heads. It's like we've just given ourselves new life! With this product, you can feel the same sensation without using your strands, and that means no one has to miss out on any of their color or locks for one day only while they wait in line at the salon.

The magical hair mask lets us change our background whenever we're bored without losing color from throughs or strands; what better way to pass the time? Plus, with its fulfillment benefits, it makes sure nobody misses out on those good vibes either. We may utilize a custom hair brush in the Layers palette to create new hair. Finally, we examine hair masking on a gray or solid black background.

Refine Edge Masking
Tutorials in-depth In the Channels panel, I demonstrated how to create an alpha layer mask step by step. Refine Edge is an Adobe Photoshop tool that allows you to mask out (or erase away) the background of your images automatically. It's extremely easy to use and flexible enough to accommodate almost any image, regardless of how complicated it may be. Here's the result I got with this article's subject (the black dog): Easy to mask hair for cutout long hair, blonde hair, darker hair, and black hair with refine edge masking. When it comes to hair layers, hair selection is crucial. Keep hair texture and edge-to-edge choices in mind. Using the refine edge brush can help smooth hair edges.
The texture of one's hair can say a lot about them. For example, if someone has thick and wavy locks with long layers down to their shoulders, they might be more likely to care for other aspects of life like school or work, while those who have thin strands may spend all day on social media scrolling through posts until it's time for bed without doing anything productive at all! To refine hair on the background layer, I usually use the quick selection tool.
Before (notice the square around my hand?) That's because I was holding down the "shift" key while drawing my Refine Brush.)
The whole process took about 10 minutes from start to finish. In order to make a mask like this, one has to paint along all four sides of an object to distinguish between boundaries and backgrounds. You begin by creating a rough selection around the object you want to mask out. The Refine Edge tool will act on that selection when you're done painting and create a mask for you automatically. You can then apply the mask to the selection in order to remove the background from your image.
If you're not interested in creating a mask by hand, there are a variety of other ways to use Photoshop's various tools and features. For example, with this particular dog, I could have made use of Photoshop's new Focus Area feature, which was designed specifically for situations like this one! In any case, let's get started on learning how to make a mask manually.
COMPLETING THE MASK Start by making a rough circular selection around the subject of your image. This will be the area that Refine Edge will act on when we're done painting, so you should try to make this area as small as possible. You can always go back and refine your selection later if you need to!
You may notice a red overlay surrounding your selection; this means that the mask is not yet complete and something is still selected (if you were to apply this mask right now, it would cover the entire image). If there are any areas that Refine Edge couldn't completely mask out, they should appear highlighted in red. Those sections will be removed from your selection when you click "Refine Edge".
If everything looks alright to you at this point, click "Refine Edge" to create your mask!
If there are any areas that still appear highlighted in red, it means they weren't completely masked out. As I said before, you can fix these by refining your selection. If you need to make it bigger (by adding more area), use the "+" sign below the Refine Edge menu. If you need to make it smaller (by removing the area), use the "-" sign.
You can also move your selection around by clicking within the image and dragging it with your mouse. The added benefit of this is that if something unexpected happens or you accidentally distort your selection, just undo what you've done, and no harm will have been done; your selection will return to its original size and position. Or, if you need to change the shape of your selection, use the "Elliptical Marquee Tool" (the one that looks like an oval) by holding down the shift key while drawing it with your mouse.
You can also adjust how large of an area Refine Edge considers to be "the same color" by moving the "Fuzziness" slider. A lower value means that it will consider two areas of slightly different colors as being the same, while a higher value means that it will consider two areas of exactly the same color to be different (and thus ignore them).
Get professional results fast and easily with the magic wand selection tool. You'll get the best results possible every single time with the Magic Wand Selection Tool because it selects exactly what you click. And since the tool uses multiple sampling methods, even very small objects such as hairs become perfectly selected. The Magic Wand Selection Tool works like a charm on both regular images and RAW files. Just select the area you want to edit and let go. Your editing experience goes beyond simple selections.
Women often wear a hair mask to keep their locks looking clean and healthy. Women's skin might be delicate, but it can handle the harshness of chemicals without issue!
Photoshop is full of great tutorials for making stylish makeup looks or even simple things like converting black and white photos into vibrant colors; there's no reason why you should struggle with basic skills such as image editing if they're not your thing either way just yet, though we'll always have one favorite skill: women's hair masking in Photoshop.
Layers panel in Adobe Photoshop
Removing Unwanted Marks On An Image Using The Curves Tool In Photoshop
Remove White Shading Around Your Subject's Hair Using The Curves Tool
If you find yourself wondering why people pay hundreds of dollars per hour for Photoshop tutorials, here's one reason: because they know it takes practice to master something new. You'll discover some helpful tips and tricks along the way, like how to create realistic hairstyles, perfect lighting techniques, and even learn how to fix red-eye problems. Remove the background and make a white background for the images. White background images always have a standard look. Other background colors reflect in the eyes.
In addition, we explore advanced topics such as creating complex backgrounds, white backgrounds, adding 3D effects, working with layers, and fixing lens distortion issues.
For varied hair colors, we may utilize the Lasso tool to mask them. Hair color is now in vogue.
Layer Mask
Layer masking For A Perfect Retouched Hairstyle
photoshop cs3 masking hair
We also go over different tools used throughout the tutorial, including brushes, adjustment layers, paths, selection tools, filters, masks, liquify tools, content-aware fill options, healing brushes, etc., which can save hours of work once mastered.
You don't necessarily need Photoshop to follow this tutorial, however, since the same principles apply whether you use Lightroom, GIMP, Corel Paint Shop Pro, or another alternative software package. We recommend using Photoshop, though, simply for familiarity reasons. If you've never worked with editing photos before, this tutorial is a must-watch.
If you're looking for hair masking, Please visit our Website at: https://dinamicostudio.com/service/image-masking