Ghost Mannequin Photography & 3D Neck-Joint Editing Guide (2026 Studio Manual)
Key Takeaways & Summary
- 3D Volume Without Model Overhead: Ghost mannequin editing preserves authentic shoulder and torso drape at $8–$18/SKU vs. $180–$450+ for live studio model shoots.
- Always Shoot Matching Inserts: Capture inside collar, brand label, and inner bottom-hem inserts under the exact same lighting and white balance as the main mannequin frame.
- Interior Depth Shadow Is Essential: A 15–25% interior ambient occlusion shadow gradient behind the collar and lapels is what makes a composite read as lifelike 3D apparel.
- Human Pen Tool Beats AI Inpainting: Manual vector clipping paths and authentic insert compositing eliminate AI-hallucinated brand labels, warped stripes, and knitwear halos.
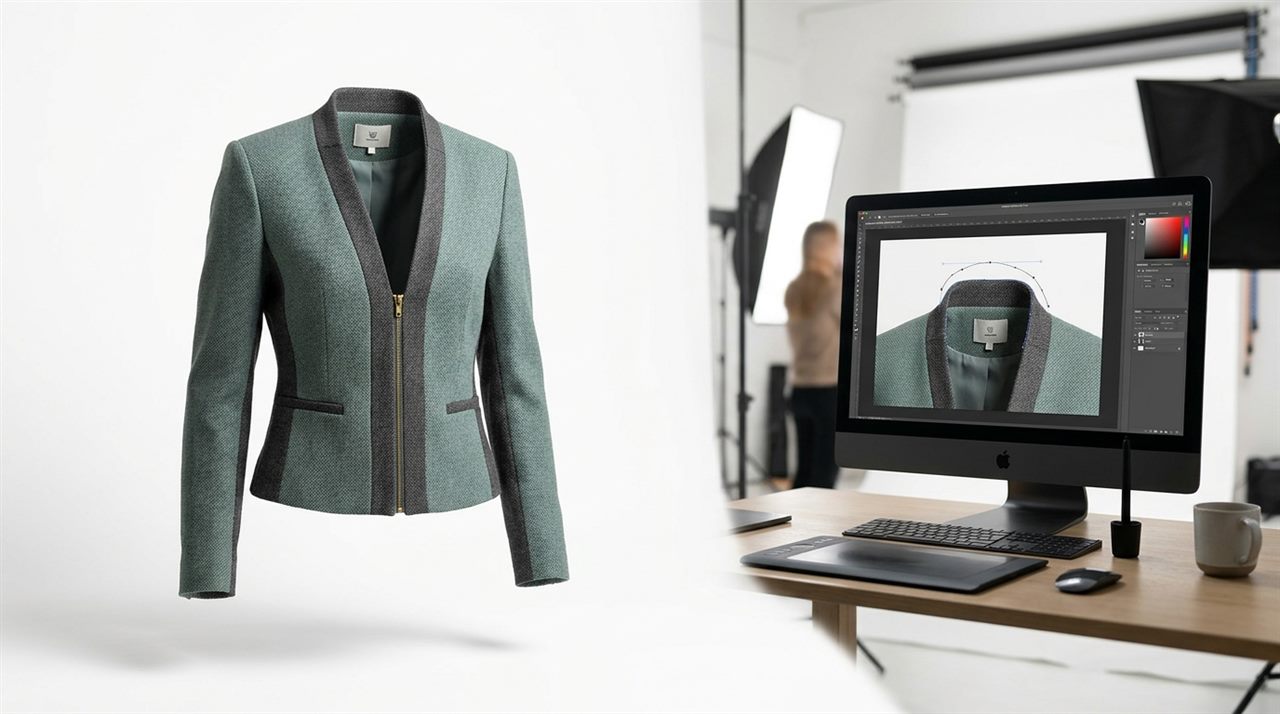
In e-commerce fashion, shoppers cannot touch your fabric, inspect the drape of a blazer shoulder, or feel the weight of a brushed-cotton hoodie. When apparel is photographed flat on a table, garments lose their natural three-dimensional volume—causing hesitation and return rates that regularly exceed 28% on online apparel stores. Yet hiring live studio models for every seasonal SKU costs $180–$450 per product once casting, styling, hair/makeup, and usage rights are factored in. That is why ghost mannequin photography and 3D neck-joint compositing has become the gold standard for scalable fashion catalogs worldwide.
This 2026 commercial manual walks apparel brands, studio photographers, and e-commerce creative directors through the entire end-to-end production system: choosing modular mannequins, lighting for crisp fabric texture, capturing clean interior neck/hem inserts, executing pixel-accurate Photoshop Pen Tool composites, sculpting realistic 3D interior depth shadows, and enforcing strict pre-publish quality assurance. Every benchmark and technique below comes directly from Dinamico Studio's dedicated ghost mannequin post-production desk, where our retouchers process thousands of fashion SKUs weekly for Shopify, Amazon, Zalando, and luxury wholesale lookbooks.
1. What Is Ghost Mannequin (3D Hollow-Man) Editing & Why Apparel Brands Depend on It
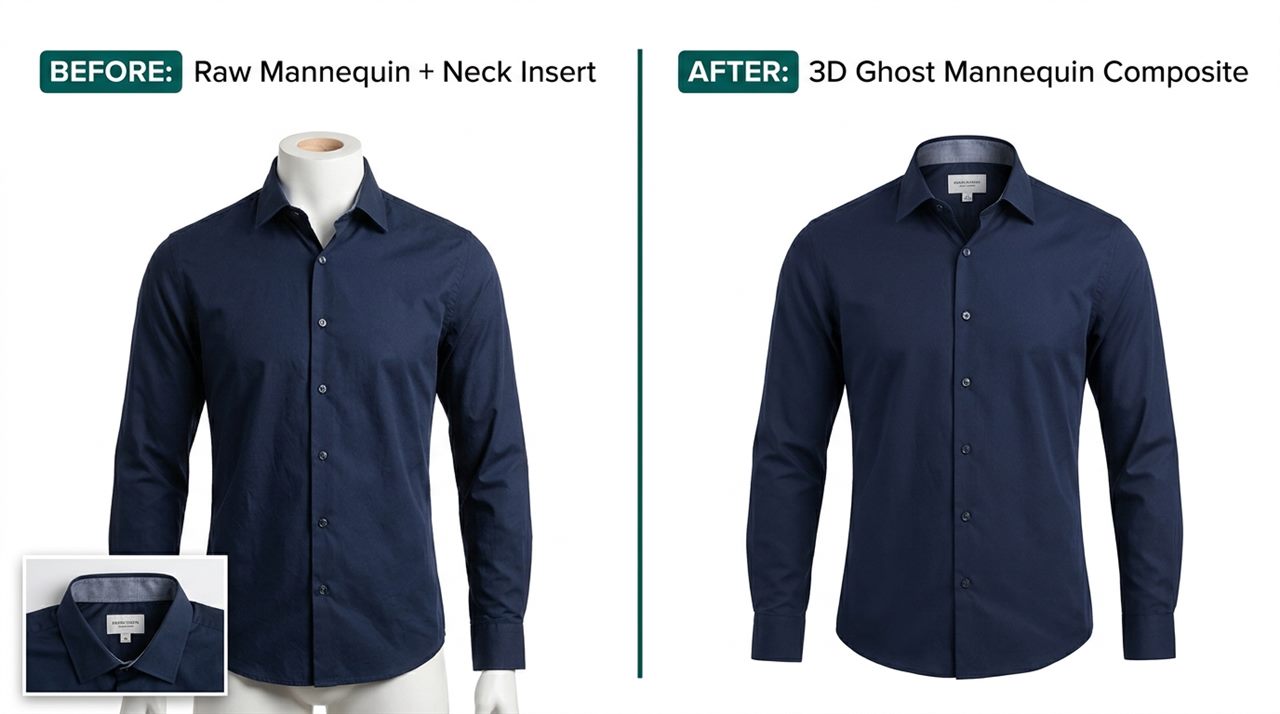
Ghost mannequin editing—also known as invisible mannequin, hollow-man photography, or 3D neck-joint compositing—is a two-stage photography and Photoshop retouching technique. First, a garment is photographed on a physical matte studio mannequin so the shoulders, chest, waist, and sleeves hold their authentic tailored drape. Second, the garment is turned inside-out (or shot flat on a foam board) to capture the interior collar, brand label, and inner lining. In post-production, a retoucher removes the mannequin completely and seamlessly stitches the interior collar and hem layers behind the front shell, adding directional interior shadow gradients so the viewer sees a lifelike, floating 3D garment with zero visual distraction.
Unlike flat-lay photography, which flattens darts, pleats, and structured lapels, a properly composited ghost mannequin image communicates silhouette, tailoring structure, and interior garment quality in a single glance. It also eliminates the visual inconsistency of live-model shoots—where skin tone, posture, hair placement, and cropping shift from one collection drop to the next—giving your category grids razor-sharp visual rhythm.
3D Ghost Mannequin
Consistency: 99% uniform
Best For: Core PDPs, Amazon, Shopify & Zalando grids
Live Studio Model
Consistency: Moderate drift
Best For: Lookbooks & secondary PDP lifestyle slides
Flat-Lay Styling
Consistency: Heavy pinning
Best For: T-shirts, childrenswear & social flat-lays
Hanger Shots
Consistency: Low (hooks)
Best For: Resale & quick internal merchandising
2. Conversion Lift & Return-Rate Benchmarks Across Apparel Categories (2026 Data)
When fashion brands migrate from flat-lay or hanger catalogs to standardized 3D ghost mannequin hero images, two measurable commercial KPIs move immediately: Add-to-Cart rate increases because shoppers trust the garment silhouette, and "fit/appearance not as expected" returns drop because the interior lining, collar structure, and true fabric color are clearly represented.
Add-to-Cart Lift vs. Flat-Lay by Category (2026 Audit)
n = 680 Fashion SKUsMeasured PDP Add-to-Cart conversion lift after upgrading main imagery to 3D ghost mannequin composites:
Just as important, marketplaces like Amazon strictly enforce adult apparel main-image rules: adult clothing must be photographed on a live human model or rendered cleanly via invisible mannequin editing—flat-lays are frequently suppressed in adult fashion categories. For exact pixel dimensions and RGB white thresholds across marketplaces, pair this guide with our 2026 Amazon, Shopify & Etsy Product Image Requirements Spec Sheet.
3. Studio Shooting Setup: Modular Mannequins, Styling Prep & Lighting
Great ghost mannequin editing starts on set. Even the most skilled Photoshop retoucher cannot invent crisp collar stitching or fix wildly mismatched lighting angles between the front shell and the neck insert. Investing 20 minutes into a repeatable studio blueprint cuts post-production turnaround time in half and delivers noticeably cleaner results.
Choosing the Right Modular Ghost Mannequin
- Magnetic Removable V-Neck & Chest Pieces: Buy a matte white or matte light-gray fiberglass ghost mannequin with removable neck, chest, and arm-cap sections. Detaching the V-neck chest plate before shooting low-cut blouses, scoop-neck tees, or open blazers saves extensive cloning around collarbones.
- Matte Finish Only (Never Glossy): Glossy white mannequins bounce harsh specular glare onto dark fabrics like navy wool, satin, or black denim, creating cyan/gray color casts along inner hems.
- Match Mannequin Sizing to Sample Sizing: Always dress a Medium sample on a Medium mannequin. Over-stretching a Small garment across a Large bust distorts knit patterns and pulls button plackets open; conversely, draping an XL coat over a slim mannequin forces heavy rear clamping that twists side seams.
Garment Prep & Styling Discipline
- Commercial Steaming Before Every Frame: Steam every garment thoroughly—especially collar points, plackets, cuffs, and bottom hems. Retouchers can clean minor compression creases, but deep shipping folds distort textile weave patterns and inflate editing costs.
- Invisible Rear Pinning & Tissue Stuffing: Use styling clips strictly along the center-back spine to pull the front silhouette taut without creating unnatural diagonal tension lines. Stuff light tissue paper inside floppy pockets, hoods, or limp sleeves so they maintain natural cylindrical volume.
- Symmetry Check via Live-View Grid: Turn on your camera's 3×3 rule-of-thirds overlay (or tether into Capture One / Lightroom with a fixed horizontal shoulder guide). Verify that both shoulder seams, sleeve cuffs, and bottom hem corners sit at identical heights before pressing the shutter.
Lighting, Camera & Lens Configuration
- Lens & Focal Length: Shoot with an
85mmor70–200mmlens zoomed to85–105mmatf/8 – f/11. Wide-angle lenses (35mmor50mm) introduce barrel distortion that makes shoulders look disproportionately wide and waistlines pinched. - Camera Height: Position the lens strictly parallel to the garment's chest midpoint (typically
115–130 cmfrom the floor) on a heavy rolling studio stand so vertical seams never converge. - Three-Point Diffused Lighting: Use two large vertical strip softboxes or octaboxes at 45° left and right (one key at full power, one fill at -0.5 EV to preserve subtle 3D fabric modeling), plus a dedicated background strobe illuminating the seamless paper at +0.7 EV above key—bright enough for clean edge separation without wrapping light spill around dark sleeves.
- Color Calibration: Shoot a 24-patch ColorChecker card at the start of every lighting setup in 16-bit RAW so your multi-SKU color matching stays within Delta-E < 2.0 across the entire collection.
4. Capturing Clean Inside Neck, Sleeve & Hem Insert Shots
The single most common mistake in DIY ghost mannequin shoots is forgetting—or rushing—the interior insert frames. Remember: every opening where a shopper would naturally see the inside of the garment needs a matching insert shot taken under the exact same lighting and camera angle.
T-Shirts, Sweaters & Polos
Blazers, Coats & Open Jackets
Hoodies & Zip-Up Sweatshirts
Pants, Jeans & Dresses
5. The 7-Stage Photoshop 3D Neck-Joint Compositing Pipeline
Once RAW frames enter post-production, precision matters far more than speed shortcuts. Automated AI background removers routinely chew through fuzzy cashmere edges, hallucinate crooked collar labels, or leave flat, shadowless neck cavities that look pasted together. Below is the exact 7-stage non-destructive workflow our senior apparel retouchers execute on every file.
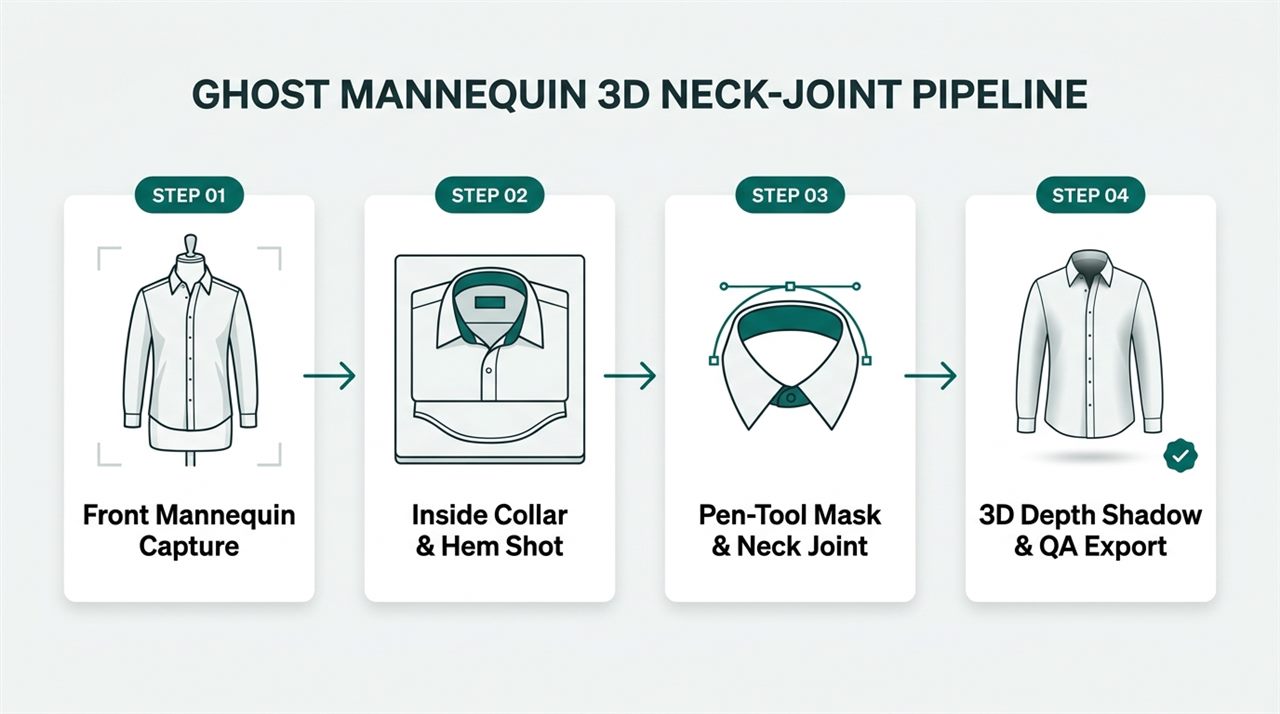
Stage 1: 16-Bit RAW Synchronization & Lens Profile Correction
Open both the main mannequin frame and the interior insert frame together in Adobe Camera Raw (ACR). Apply identical lens profile corrections (removing chromatic aberration and barrel distortion), synchronize white balance off your studio gray card, and match exposure across both frames. If the interior insert shot is even 0.4 EV brighter or warmer than the front shell, the stitched neck joint will visibly clash.
Stage 2: Hand-Drawn Vector Clipping Path (0.5px Inset)
Select the Photoshop Pen Tool (P) and plot a clean, closed Bezier vector path around the entire outer silhouette of the garment, tucking the path 0.5 px inside the fabric edge to eliminate studio background color spill. Save this path as Path 1 (delivering an embedded vector clipping path allows downstream print and wholesale teams to repurpose the garment on any color backdrop). For mohair, faux fur, shearling, or translucent chiffon sleeves, switch to alpha-channel layer masking so individual micro-fibers stay intact.
Stage 3: Mannequin Removal & Interior Cavity Cutout
Convert the vector path to a non-destructive Layer Mask with a subtle 0.3 – 0.5 px feather (never a blurry 2px+ feather that makes tailoring look soft). Create a second sub-path strictly tracing the inner neckline, sleeve openings, and bottom hem where the plastic mannequin is visible, and mask those cavities cleanly out to transparency.
Stage 4: Neck-Joint & Inner-Lining Layer Alignment
Place the interior insert shot on a separate layer directly beneath the masked front garment layer. Mask away everything on the insert layer except the interior collar, brand tag, shoulder seam tape, and inner hem. Use Edit → Transform → Warp (with a 3×3 or 5×5 custom mesh) to gently curve the interior collar edges so the left and right shoulder seams meet the front garment's exact stitching line—keeping the brand label dead-center and strictly horizontal.
Stage 5: Sculpting Realistic 3D Interior Depth Shadows
This single step separates amateur cutouts from luxury fashion imagery. Because light physically cannot reach deep inside a worn garment, an unshaded neck insert looks flat and stickers-on-paper fake. Clip a new Curves adjustment layer (pulled down 15–25% in midtones) or a soft Multiply shadow layer directly to the interior insert layer. Using a large, 0%-hardness brush at 10–15% flow, paint a gradual ambient occlusion shadow falling from the top inner collar rim downward toward the chest cavity, plus tighter contact shadows directly behind overlapping lapels, plackets, and bottom hems.
Stage 6: Symmetrical Shaping, Liquify & Wrinkle Cleanup
Turn on Photoshop's rulers and drop vertical center guides plus horizontal guides at the shoulders, armpits, sleeve cuffs, and bottom hem. Use the Liquify filter (with a large low-pressure Forward Warp brush) to gently balance slight asymmetries in sleeve length or hem droop without warping striped, plaid, or ribbed knit patterns. Next, use a 16-bit Frequency Separation action (separating color/tone on the Low Frequency layer from fabric weave on the High Frequency layer) to smooth distracting shipping creases and remove stray threads or lint—leaving every stitch and cotton fiber razor-sharp.
Stage 7: Grounded Contact Shadow & Standardized Canvas Export
Place a verified pure white RGB 255, 255, 255 fill layer at the bottom of the stack (or your brand's neutral #F6F6F6 studio tint for Shopify editorial grids). If your brand style calls for grounded depth, add a subtle, soft natural floor or ambient shadow on an independent Multiply layer. Finally, align the garment to your standardized template margin (e.g., 85% vertical fill centered horizontally), convert to 8-bit sRGB IEC61966-2.1, embed the ICC profile, and export your channel-ready JPEGs alongside the layered PSD master.
6. AI Ghost Mannequin Generators vs. Manual Retouching (2026 Audit)
In 2026, dozens of browser-based AI tools claim "one-click ghost mannequin removal." While generative AI is useful for quick internal mood boards, our studio audited 1,000 commercial apparel SKUs processed through leading AI ghost mannequin tools versus human Pen Tool compositors. The defect gap explains why serious fashion brands still refuse to automate their hero PDP imagery:
Share of AI Ghost Mannequin QA Rejections (1,000 Apparel SKUs)
Primary root cause recorded on rejected AI-generated ghost mannequin images during commercial brand QA audits:
Because generative inpainting literally guesses what the inside of your collar looks like rather than compositing your real interior photograph, it alters trademarked woven labels, invents wrong fabric linings, and breaks print patterns. For deeper data on how human-led hybrid workflows cut e-commerce return rates, see our Zero-Return E-Commerce Retouching Guide.
7. Solving Tricky Apparel Edge Cases (Sheer Fabrics, Knitwear, Hoodies & Multi-Colorways)
- Sheer Chiffon, Organza & Lace: Never use a solid opaque clipping path on semi-transparent sleeves. Shoot against a clean white sweep, isolate opaque bodice panels with a Pen Tool path, and extract translucent lace/chiffon via Luminosity/Channel Masking so the subtle sheer transparency remains visible over the backdrop.
- Heavy Knitwear, Cashmere & Shearling: Hard vector paths slice off the soft fuzzy halo that signals premium wool quality. Combine a core vector path with a refined hair/fur brush edge mask at 200% zoom so natural yarn fibers remain intact without gray background halos.
- Multi-Colorway SKUs (10+ Colors of the Same Style): You do not need to shoot and ghost-mannequin-edit all 12 colorways of a polo shirt or hoodie. Shoot and composite one neutral light-gray or white master garment, then use multi-path Photoshop recoloring matched to physical Pantone swatches—saving up to 70% of studio shooting time while guaranteeing 100% identical drape across every color swatch on your PDP.
- Reflective Puffer Jackets & Patent Leather: Glossy nylon puffers pick up studio softboxes as harsh white rectangles. Soften distracting reflections on a separate Dodge & Burn layer while preserving crisp specular highlights along quilted baffle seams so the jacket still reads as glossy down rather than matte cotton.
8. The 7-Point Ghost Mannequin Quality Assurance (QA) Checklist
Before approving any ghost mannequin batch from an in-house editor or outsourcing partner, inspect every SKU against these 7 non-negotiable studio QA gates at 200% zoom:
- Tri-Background Edge Audit: Toggle the garment over pure black (
#000000), 50% gray (#808080), and pure white (#FFFFFF). Zero white fringe, zero jagged stair-stepping, and zero accidental notches along collars or cuffs. - Collar Seam Continuity: Zoom to 200% on both left and right neck joints. The front shoulder seam must transition cleanly into the interior collar edge with no abrupt step, double-stitch ghosting, or misaligned stripes.
- Brand Label Legibility & Leveling: Verify the woven neck label is 100% authentic (from the real insert photo), horizontally level, free of distortion, and cleanly readable when shoppers hover-zoom.
- Interior 3D Depth Shading: Confirm the inner neck cavity and inner bottom hem are naturally 15–25% darker than the front exterior fabric, with a smooth ambient gradient—never flat, never muddy black.
- Horizontal & Vertical Symmetry: Check sleeve cuffs, shoulder peaks, and bottom hem corners against horizontal guides. Sleeves must hang at matching angles and widths.
- Texture & Color Integrity: Verify wrinkle removal used Frequency Separation (fabric weave intact, zero plastic Gaussian-blur patches) and colors match the physical garment in 8-bit
sRGB. - Uniform Collection Grid Alignment: Open 6–8 finished SKUs side by side in a contact sheet. Collar heights, canvas margins, and visual garment scale must align identically across the collection grid.
9. In-House Editing vs. Dedicated Ghost Mannequin Outsourcing (Cost & Turnaround)
A thorough, QA-verified ghost mannequin composite takes an experienced retoucher 18 to 30 minutes per SKU—longer for intricate multi-layer blazers, sheer lace dresses, or striped knits. For a seasonal drop of 250 apparel SKUs, that equals 85–125 hours of specialized Photoshop labor.
Outsourcing to a dedicated commercial studio like Dinamico Studio lets fashion brands convert fixed payroll overhead into predictable per-SKU pricing (starting from just $0.99–$1.99 per image depending on garment complexity and volume—see our transparent Photo Editing Pricing), with 12- to 24-hour overnight turnaround, embedded clipping paths, layered PSD delivery on request, and strict multi-stage QA.
Test Our 3D Ghost Mannequin Quality on Your Own Garments (Free Trial)
Send us 2–3 raw mannequin + neck insert shots (RAW, TIFF, PSD, or JPEG—direct encrypted upload up to 2 GB per file). Our senior apparel retouchers will hand-composite your 3D ghost mannequin samples within 12–24 hours so you can inspect the collar seam, interior shadow depth, and edge precision at 200% zoom before committing to a full catalog.
10. Frequently Asked Questions (FAQ)
1. How many photos do I need to take for one ghost mannequin product image?
At minimum, capture two photos: (1) the front of the garment worn on a mannequin, and (2) an inside neck/collar insert shot showing the interior lining and brand tag. For open jackets, coats, hoodies, or flared dresses, add a third shot showing the lower interior hem or inside hood lining.
2. Can you create a ghost mannequin effect if I forgot to shoot the inside neck insert?
For simple crewnecks or solid-color tees, a skilled retoucher can reconstruct a clean matching interior fabric collar using texture sampling from the garment itself—though an authentic brand label can only appear if provided separately or captured in an insert shot. For lined blazers, patterned shirts, and hoodies, always capture the real insert photo.
3. Is ghost mannequin photography allowed for Amazon Fashion main images?
Yes. Amazon permits invisible/ghost mannequin imagery alongside live-model shots for adult apparel main images, provided the mannequin is 100% removed, the background is verified pure white (RGB 255, 255, 255), and the garment fills at least 85% of a 1600px+ frame.
4. Why does manual Photoshop Pen Tool compositing beat AI ghost mannequin tools?
AI tools hallucinate distorted neck labels, flatten 3D interior depth shadows, warp stripes or plaid weaves, and leave light halos on dark knitwear. Manual Pen Tool clipping paths combined with real interior insert compositing deliver 100% brand-accurate labels, crisp seams, and authentic textile texture.
5. What file formats should I send for professional ghost mannequin editing?
16-bit Camera RAW files (CR2, CR3, NEF, ARW, DNG) or uncompressed TIFFs give the best highlight recovery and color accuracy, though high-resolution JPEGs and PSDs are fully supported. Our direct-to-S3 portal accepts files up to 2 GB each.
6. How fast can Dinamico Studio turn around a full seasonal apparel collection?
Standard turnaround is 12 to 24 hours for batches up to 500+ apparel images, with express 6-hour rush lanes available for urgent marketplace launches and wholesale lookbook deadlines.
Related Photo Editing Guides
Amazon, Shopify & Etsy Product Image Requirements...
In 2026, your product photographs do far more than illustrate what you sell—they directly determine...
Read Guide »
Jewelry Photo Retouching in 2026: The Complete...
Jewelry photo retouching is the specialized commercial post-production discipline of eliminating...
Read Guide »
Background Removal for E-commerce Product Photos...
Studio Production Standard Need 100% Marketplace-Compliant Background Removal in Bulk? Send us your...
Read Guide »