How to Create Shadow in Photoshop
Photoshop shadow effects are the method of digitally changing an original image in its original form to give it either a specified or desired appearance. With the right Photoshop tools, you too can add a shadow to an image to provide it with realistic and perceived depth. The Photoshop shadow effect adds realism to anyone who looks at the photo and, as such, is very popular among designers. There are several ways by which one can add shadow to a photograph.
Natural Shadows
Some people prefer to make the background of the photo a dark color that matches the color of the object to be shadowed. This creates the effect of natural shadows. To make this effect work for a colored background, you should also use the shadow color that goes with the background. If you make the colors match, the natural shadow will be rendered correctly.
If your picture has a white background, you need to create a black version of the same shape if you want to get any shade on the objects. You can do this easily using the Eraser tool. Once you have created the shadow layer, click OK. Select the Erase tab from the Layers panel menu bar and choose Black Color from the list box. Then select the area where the shadow needs to appear and press the Delete key combination. Repeat this process until all areas of the image are covered up. In addition, some parts of the image may not be darkened because they already contain shades that don't blend well with the new shadow layer. These regions can be revealed before adding the shadow so as not to lose them during the process. Now go back into the Layers palette again and delete the previous shadow layer. Create another black-colored shadow layer and repeat what was done earlier. At first, only the darker part of the image will show, but more details will emerge as the layers merge together. When everything blends seamlessly, stop creating layers. It's now ready to move on to the next step.
Drop Shadows
The most common type of shadow used today is called a Drop Shadow. A drop shadow is added to images when their backgrounds are lighter than the subject itself. For example, if you take a picture indoors, the chances are that the walls might look light against the subjects since there isn't much ambient lighting. So how does one achieve this? One way is to simply lower the Opacity value of the background layer to zero percent. You won't see anything behind the subject using these methods except darkness. However, there's still something missing: The edges of the subject aren't sharp enough. That's why we're going to introduce two other types of shadows? Soft Edges and Hard Edge Shadows.
Soft Edges
Soft edge shadows use softening techniques to soften the transitions between each layer. They help smooth out the edges of the final piece. The best thing about this technique is that it doesn't require extra effort; just place one of the layers below the others and adjust the Blending Mode settings accordingly.
Hard Edges
Hard-edge shadows usually come in three forms: Gradient, Reflection, and Bevel/Emboss. Each has its own advantages. We'll start off with gradient shadows and explain how to apply them later. Gradients are made up of multiple colors that gradually fade away from each other. Since gradients are composed of many different colors, they tend to affect every single pixel differently, making them perfect for shading purposes.
To add a gradient effect, follow the steps outlined above to make sure that the Background Layer contains no color at all. Afterward, duplicate the Background Layer by pressing Ctrl + J or Command +J. Go ahead and change both copies' Blend Modes to Linear Light. Next, drag an appropriately colored rectangle anywhere inside the duplicated layer. This creates a gradient pattern that serves as our base. Finally, reduce the opacity of the original layer down to around 2%. If you find that the bottom half looks too dark compared to the visible portion, increase the Opacity setting of the original layer.
Reflections Shadow
To add reflections, you must start with a surface that reflects light. There are several ways to accomplish this, such as placing objects like shiny metal sheets or glass panels on flat surfaces. Another method involves painting thin lines on a reflective object. While drawing these lines, keep in mind that the reflection should always fall along the line direction. Otherwise, the result could end up looking very messy. Next, let's try applying a reflection ourselves! Start by duplicating the current layer once again. Change the Blend Mode to Multiply. Afterward, draw a red horizontal line across the entire canvas starting from the left side. As soon as the line reaches the right-hand corner, immediately shift the brush tip downward and continue tracing downwards until reaching the bottom right corner. Don't forget to erase the excess strokes afterward while working on the rest of the design.
Realistic Shadows
In order to create realistic shadows, the size of the object must be large enough to make thick shadows around it. A large object with a small size will not render any good shadows. You can add blur to create the effect of being close to a shadow. The amount of blur you add to the photo will depend on how close you want the object to be considered to be. You can experiment with different settings to find out which setting produces the best shadow.
Default Layer Shadow in Photoshop
You can also use a third-party program called "Photoshop Shadow Layers" to generate the best shadows. This is a third-party program that can be downloaded from the internet. However, there is a problem with this technique. When using a third-party program, shadows are not always rendered correctly, and some details are missing. It is not recommended to use a third-party program to create shadows.
Photoshop has an incredible number of options when it comes to creating a shadow. One option is to apply a "stage" to your image, or you can modify your image with the help of a channel palette. The stage is basically a gradient that gives the Photoshop shadow its depth. Each color in the gradient represents one color of the shadow.
Natural Shadow
Using a channel palette is one of the easiest ways of modifying a photo. There are different channels in Photoshop; they are red, magenta, blue and yellow. You can choose whichever channel color you want to use as a base for your Photoshop shadow. After choosing the correct channel palette, you will select the shadow you want to place over your product image or logo. All you need to do with the chosen channels is click on "Start" and then "Pass through." At this point, the image that is located underneath the background is modified and thus produces the Photoshop shadow that we are looking natural.
The Photoshop shadow that we are looking at above is actually the result of a combination of 3 different values:
- The light source (the light source that is being lit by the Photoshop shadow generator).
- The color of the shadow.
- The distance of the shadow from the light source.
Cast Shadow
If you look at this picture, you will notice that two shadow regions are being produced. The first shadow region appears at the light source and the second shadow region appears where the light source is slightly off from the original position. These differences produce an effect known as "cast shadow."
The problem with the shadow that is created by using a gradient is that the entire shadow is not produced at one point but rather many different points along the gradient. If this were not the case, then the whole shadow would appear as a solid color, and the gradient would not be visible. In order to get around this problem, you should ensure that all of the colors that you use for your shadow are mixed using a single value. You should also ensure that the values that you use for your shadow are all different values such that none is exactly the same in relation to each other; otherwise, your shadow will appear uneven and blotchy.
This article will show you how to create a realistic drop shadow in Photoshop.
There are two ways to go about this - one with gradients and the other with a brush.
The first option is more time-consuming but has some advantages over the second approach. It is also worth noting that if you want your photo to have an unnatural gradient on its own, then use this method. The second way uses brushes which are easier and faster for most people who aren't looking for something too custom or detailed. When selecting colors from your Image, one thing to keep in mind is that they should contrast well enough so as not to blend together once applied elsewhere on the page or canvas of Photoshop. You can always play around with opacity to customize the effect.
TIP: When creating a drop shadow for an eCommerce product photo, make sure to include some light and color in the Image itself as well; otherwise, it will look flat and unrealistic on the page of your site!
Photoshop Basics: Drop Shadow on a Layer through Selections
1. Open up your program and click on New - you can also press CTRL+N to start a new file. Hit OK or Enter to open the default settings page.
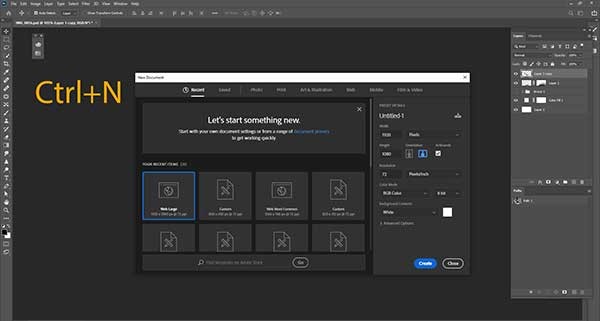
2. The most efficient way of doing this is using selections from your original Image that are blurred but not too strong. This makes them easy and fast to apply where you want them while still maintaining some flexibility of control over opacity (the less blurry they are, the more control you have, but the longer it will take to apply).
3. Select your Image and make a selection with the Pen or Polygonal Lasso tool (or whatever selection tool you prefer). Add a layer mask on top of it. Next, turn off the visibility of your original Image by clicking on an empty space in your layers window - this prevents any further editing but makes sure that all changes affect only the drop shadow itself. You may create an image layer on top and a white layer on the bottom.
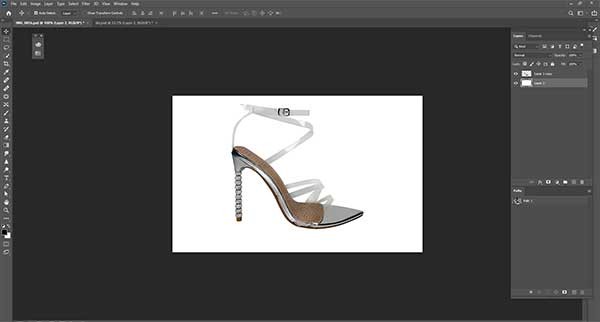
4. Change your foreground color to black (press D then X if you do not see those options in your toolbar) and use a low opacity brush set to Multiply from the drop-down menu at the upper right corner of Photoshop. The latter setting ensures that only darker colors are being mixed together for your drop shadow effect. If you want any lighter shadows instead, use a Screen layer mask instead and change the foreground color to white (press D then).
5. Make your first gradient behind an image layer. Select the foreground to transparent gradient option. Make a gradient like the one shown below.
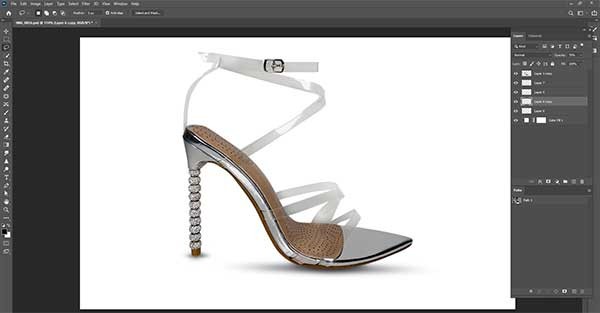
6. Press Ctrl+T or Cmd+T to make the shadow on the bottom of the shoes or object thinner. Then go to filter blur, then motion blur, and finally angle as your shadow direction. The input distance should be between 100 and 300 pixels. Finally, apply some gaussian blur.

8. The final step is to create a new layer beneath the image. Hold Ctrl and click the pictures to select them, then apply a feather radius of 3-5 pixels to soften the black and white brush. Paint a blank layer with a blur radius of 15-45 pixels. Reduce the opacity of the layer to 60-70 percent. Finally, a drop shadow was created in Photoshop.

9. Save your file as a PSD if possible using CTRL+SHIFT+S; otherwise, press File - then Save As...
Photoshop Basics: Drop Shadow on a Layer by Blending options.
1. Open a new file in Photoshop and select the Background layer. Masking or removing the background from the layer.
2. Select Image - then go to blending options from the layer panel.
3. Once the dialogue box has opened, select the drop shadow.
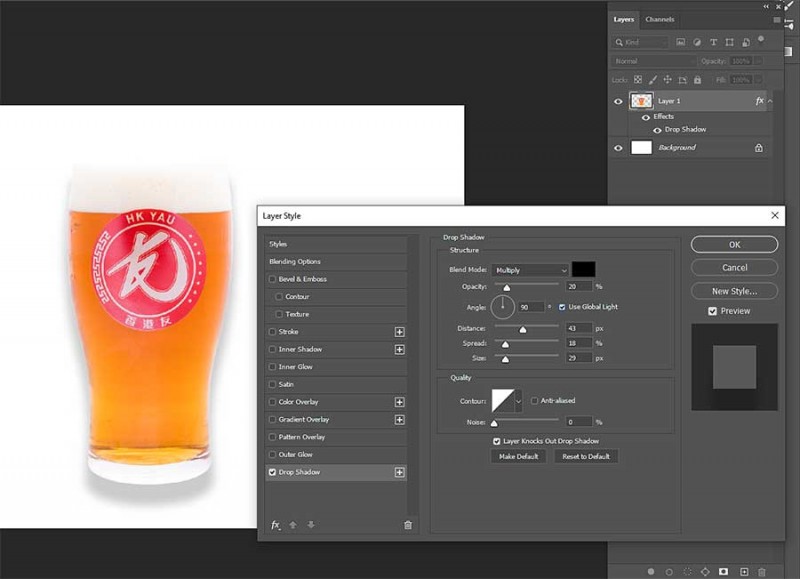
4. Blend mode select Multiply and color 100% black.
5. Set the opacity to 20-40%, the angle to 90 degrees, and the light source to global.
6. Select distance 43 px, spread 18%, and size 29 pixels then hit enter ok.
7. Now you can see how easily your drop shadow was created.

8. Merge all of your layers and save the file as a PSD, preferably using CTRL+SHIFT+S.
Drop Shadow in Ecommerce
The world of fashion has always been a bright and exciting place, but Akira makes it even more so with his use of shadows. For example, he adds depth to an otherwise flat shoe by adding a drop shadow to the picture or drawing out specific details in order for viewers on all devices can experience that design properly without feeling left out due to poor quality images.

Akira Brand
The distinction between a drop shadow and a cast shadow.
A drop shadow is an effect created by casting a shadow behind an object, as can be seen in the image above. It is used to create depth and create focus toward the front of the image. The result provides a sense of added dimension and perspective, leading your eyes to move up and down instead of left to right across the page. The placement also leads your eye into the body copy which is important where you have only one focal point to direct people's attention. The main reason for using a drop shadow is because it gives a 3D look like it's really there, while still remaining flat. So when you create a drop shadow for an object, it should be the darkest part of the image. Whether this is at the top or bottom depends on whether your light source comes from above to create a top shadow or at the side creating a side shadow. This can create depth in an otherwise 2D design. If the object has dimension (like in the above example), then create a cast shadow instead for that end of it pointing down toward the dark area. Also called "soft shadows" by some people, cast shadows are more stylized than drop shadows and go as far back as the mid-1400s in Japanese woodcuts. If you have a light source less "fixed" create a drop shadow to create depth. If you have a fixed light source create a cast shadow to create depth, depending on the direction of the object.
